Canning

Wood Butter

One of my favorite gifts from my mom are wooden spoons.  Oh the joys of a new spoon!  Little ones, big ones, ones with holes for olives, and tiny ones for salt... Now, not everyone will shriek with happiness when present a tiny hand carved spoon.  But i do!  So I was thrilled to see this post from Creative Culinary (originally Bon Appetite Hon) Now I know what I will be making all my family and co-workers for Christmas.

Several months ago Wendi withBon Appetit Hon, did a post on Wood Butter; like you I had a moment of Huh? What? Well, typically called Spoon Oil, Wendi had decided that Wood Butter fit better and I agree; leave it to another food person to put the perfect name on this elixir that is so simple but so perfect for the care of the wood items we use in the kitchen. A necessity but also a bit indulgent…yes, butter is perfect! We need to take special care of our wood kitchen items in Denver due to the low humidity in our environment and I can be as lax as the next person. Making your own ‘wood butter’ makes it simple and inexpensive too. I was reminded by my friend Jennifer at Bread and Putter that it’s also magical hand lotion…and that it is!Though Wendi had to find an online resource for the beeswax part of the magic, I was lucky to find a local resource. Peak Candle Supplies provides beeswax in small pellets for easier melting; I bought two pounds which is enough for (48) 4 oz containers…um, that should be enough for awhile don’t you think? Finding the food grade mineral oil was easy once I finally remembered to put it on my grocery list; it’s typically available in the pharmacy. I now know why that poor guy gave me such a funny look when I lamented that I wish they had more than four bottles. I’ve always used it for wood conditioning; I’m thinking he was wondering why I needed more than four bottles of a laxative. Who knew?

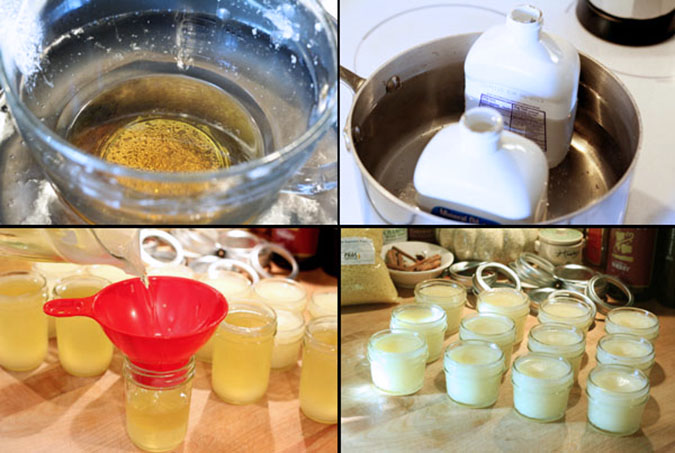
The process is easy but can be messy. Most ‘recipes’ include heating the wax in a mid size Ball jar in hot water and adding warmed mineral oil to the wax once it is melted. I preferred using a large glass measuring cup with a pour spout as I was going to be pouring the combined liquid into a whole bunch of small jars. I also used a funnel just for canning and it worked perfectly. The only negative to this method is the removal of the wax from the measuring cup and funnel. I decided since I’ll be doing this again, I’ll just save those two utensils just for this process and candle making and not worry about the residue layer that remained inside each.

What better way to show you the magic of Wood Butter than a Before and After photo. Totally untouched, promise. Everything in this photo has been treated with an application of wood butter including the bottom board. Simply apply a bit to a paper towel or a piece of cheesecloth and rub a dollop onto the surface until it’s rubbed in. The bowl in front was an inexpensive one I purchased from World Market and it was apparently never supposed to touch water. It did, I thought it ruined but ‘the butter’ did the trick. I found the wooden rolling pin at a yard sale and can’t believe the difference myself. All of my cutting boards have a renewed luster; in fact they seem new again. It is not a sage compound butter but it is a miracle butter!

Wood Butter – A Recipe for Your Utensils!Prep Time: 10 minutes

Cook Time: 35 minutes

A terrific homemade product to use for all of your wood kitchen products from wooden spoons to cutting boards.

INGREDIENTS

  • 8 ounces pure beeswax - measured dry. One package of the pellets that I purchased weighed 16 ounces and I used half a package at a time.
  • 32 ounces of mineral oil - typically packaged with 16 liquid ounces per container so I used 2 containers.

PREPARATION

  1. Bring a large saucepan filled with water to a gentle boil.
  2. Place your beeswax inside a 2 quart glass measuring cup or a 1 quart glass jar; set the glass into the gently boiling water.
  3. Place the container(s) of mineral oil inside another medium saucepan filled with water and heat to low.The mineral oil just needs to be warmed to mix with the beeswax; no need for a rolling boil.
  4. Once all the wax has melted, turn off the stove and carefully add the warmed mineral oil to the beeswax;stirring with a spoon to combine.
  5. Using a towel around the handle of the measuring cup, carefully pour the liquid into each jar fit with the canning funnel;filling them almost to the top.
  6. Finish filling all jars and wait for to cool and firm up before using.

Re-blogged from  Creative Culinary

Canning spaghetti sauce (meatless)

Last night I was cooking up a batch of organic, homemade spaghetti sauce and I thought.. I should can this!  It is so yummy!  So I started looking around for others recipes.  I was surprised by how many opinions there are about canning spaghetti sauce.  I can't wait to try these. re-blogged from The farm girl 

I have tried several different spaghetti sauce recipes and always come back to this.  We love it and it looks so pretty in the jars.
16 lbs. tomatoes (about 32 cups)
4 c. onions, chopped finely
1/4 c. garlic, minced
1 c. olive oil
1/4 c. basil
1/4 c. oregano
1 T. sugar
2 T. salt
2 t. pepper
2--12 oz. cans tomato paste
1.  Chop, blend, puree your tomatoes and place in a very thick bottomed pot.  Saute onions, garlic and oil together until onions are translucent.  Add to tomatoes along with basil, oregano, sugar, salt, pepper and paste.  Simmer for 2-3 hours, or until it reaches your desired thickness.
2.  Process in steam bath canner 20 minutes for quarts and 15 minutes for pints.  Follow your canners directions and remember because the spaghetti sauce is very hot you do not need use cold water in your canner.  Start with hot water and place on medium high heat and start timing from the time steam starts coming out.

I did read in a few different places to add citric acid.  Here is why:

Tomatoes were once considered an acid food that could be safely canned in a boiling-water canner. However, because of the potential for botulism when some newer, less acidic tomato varieties are canned, certain precautions must now be taken. Add 1 tablespoon bottled lemon juice to pints and 2 tablespoons bottled lemon juice to quarts of tomatoes. Or add one-fourth teaspoon crystalline citric acid to pints and one-half teaspoon crystalline citric acid to quarts of tomatoes. Acid can be added directly to jars before filling. Four tablespoons of 5 percent acidity vinegar per quart may be used instead of lemon juice or citric acid, however, it may cause undesirable flavor changes. Add sugar to offset acid taste if desired.
Note: Don't use fresh lemon juice as its acidity varies. Tomato canning tablets should not be used as they are ineffective. 

Very yummy soup!

This is a great cabbage soup!  It is tangy and de-lish.  Trust me, you will not be disappointed. 3 tablespoons of butter 1 medium onion (diced) 1 medium parsnip (diced) 2 medium carrots (diced) 2 ½ cups of cabbage (slice the cabbage into thin ribbons) 1 quart jar of canned diced tomatoes with juice 1 quart of pasture raised organic chicken stock 2 tables spoons of Apple cider vinegar 2 table spoons of Honey 1 ½ cups of sauerkraut (drained well) ¼ cup dark raisins ¼ cup yellow raisins 10 prunes (diced) 1 bay leaf 3 cloves of garlic

Place your Dutch oven on the stove. Put 3 tablespoons of butter in and add the onion.  Then add the parsnips, carrots and cabbage. Let that all soften for 10 minutes.  Stir it around and let all the butter soak in. Then pour in the canned tomatoes and chicken stock. Then pour in the Sauerkraut, raisins and prunes. Add bay leaf and garlic. Bring to a boil and then simmer for 45 minutes.

Salt and pepper to taste, and garnish with a dollop of sour cream on top.  To make it a little more hardy boils some small red potatoes and pour the soup over them.

For a Meat option, buy pre cooked Kielbasa.  Heat, slice, and place in the bottom of the bowl.. ladle some soup over the top.

a meeting of the minds

Yesterday I went to a networking meeting my Garden Inspirations buddies organized at Ann’s Health Food Center in Waxahachie TX. It was really great to meet other people in our area that have the same interests as me.  Some of their specialties included; food safety concerns, organic farming, natural ranchers, organic gardeners and just other people living creatively.  This group of people is so important to DFW and surrounding area.

I am looking forward to getting in touch with those I met!  Hopefully I will get to conducting some traveling workshops. :)

[caption id="attachment_504" align="aligncenter" width="490" caption="if this is your photo please contact me so I can give you credit for being so awesome."][/caption]

Local Awesome Alert: Garden Inspirations Classes

Want to learn how to grow an organic vegetable garden?  How to make and use compost?  What about canning and preservation classes? Container gardens? Meet the architects of your new & better life, mother and daughter team Donelle and Marilyn Simmons.  They are the proprietors and operators of Garden Inspirations.  Which is WAY more than a farm/garden.  From start to finish these ladies can teach you what you need to know to change your life and footprint.

Spring classes are forming now.  Visit their website and get signed up!   http://www.gardeninspirations-tx.com/index.html

Pear Ginger Butter

Ingredients 4 to 5 lbs of chopped pears.  Core them, but do not peel them.  Just removed any damaged parts 1 star anise 2 tbsp chopped fresh ginger 2 cups water 1 cup lemon juice (6 small lemons will = 1 cup of juice) 3 or 4 cups a sugar ½ teaspoon ground cardamom ½ teaspoon ground nutmeg 1 teaspoon lemon zest

Equipment needed A wide 8 quart, thick bottom pan or Dutch oven food processor water bath canner 6-8 8oz ounce canning jars, lids, and rings (you can get these pretty cheap at a hardware store)

Put chopped up pears, star anise, and ginger into a large pot.  Add 2 cups of water and 1 cup of lemon juice.

Bring to a boil, reduce to a simmer, cover and cook until the pears are soft.  About 25-45 minutes.  Remove from heat

Scoop out the Star Anise.  Ladle the pear mixture (liquid included) into a food processor.  Puree!

Scoop the puree back into the thick bottom pan.  For every cup of pear puree, add ½ cup of sugar.  Add the cardamom, nutmeg, and lemon zest.  Taste and season if needed.

Cook on Medium heat, siring often to prevent puree from sticking to the bottom if the pan and burning, Cook until the mixture is thick.  Place a spoonful on a chilled plate.  If liquid does not run out from the purée it is READY!  This could take any where form 45 minutes to 2 hours.  The longer the better.  The pears will continue to break down and get smoother, and smoother.

While the mixture is cooking, sterilize your jars for canning.  To sterilize the jars, either 1 run them through the dish washer, 2 rinse them and place them in a 225F oven for 10 minutes, or 3 place them on top of a steaming rack in a large pot of water which you bring to a boil for 10 minutes.

When the Pear butter is ready, pour into hot, sterilized jars and allow for ¼ inch head space.  (Head space is the distance between the jam and the rim of the jar.)  Wipe the rims off and place the lids (these should be under hot running water in a bowl) on the jars.  If you do not wipe off the rims, the jar will not seal.

Screw on the ring and place in the canner water bath.  Repeat until canner is full!  Use a hot water bath for 10 minutes to ensure a good seal.

[caption id="attachment_253" align="aligncenter" width="490" caption="My very sweet husband helps me with this part!"][/caption]

After 10 minutes remove, tighten again, and place under a towel.  DO NOT let the hot jars touch, and don’t peek until the morning.